*Please contact the Inline Support team if you need assistance with the creating or managing a Queue.
Email- support@inlinedatasystems.com
Phone- 618-208-4058
This document will walk you through the steps to Create a New Queue, or Manage an existing Queue.
1. Go to Setup > Environment > Manage Queues
2. Click on existing queues to edit or click the Green + to add a new queue
a. Name- Add a name for the Queue
b. Category – Select the Category Type
i. Leads & Contacts – defined below
ii. Lead – A record that has been imported into the system, but the file has not
been opened
iii. Contact – A lead that has been opened
iv. Quote – A contact that has a quote attached
v. Policy - A contact with a sold policy attached
c. Distribution Type
i. None – no distribution, leads will just be in the queue
ii. Round Robin – Leads are distributed evenly throughout Users assigned to the
queue
iii. Tiered – Leads are distributed based on the order you select
iv. Retrieval – When in the queue, leads will be assigned when users
manually select the “Retrieval” button
d. Affiliates – This is used if you would like for this queue to be presented to only Users
assigned to this Affiliate. This field can be left blank.
e. Fill Type – Manual or Schedule
i. Manual – Users will manually add leads to the queue by clicking the 3 bars in a
record > View Queues > Select the Queue you’d like to add the record to > Add
to Queue > Close
ii. Scheduled- Select your desired scheduled
f. Auto Assign To: Select if you’d like No Assignment, or if you’d like the leads auto
assigned to the Policy User, Policy User 2, or Policy User 3
g. Record Fill Query – Query Builder - This is where you will build the query to pull
desired records
h. Remove By Criteria – If this box is checked, the lead will be removed when it no
longer meets the conditions you have set in the Query Builder
i. Add to Campaign - If a Campaign is added, reporting would be available to view and
understand the performance of the queue. (Ex.- You have a renewal queue and want to
view how many of these records were converted into New Sales)
j. Filter History – Applies filters so you can view the history of the lead. * To view Queue
history, you MUST have record history turned on
k. Schedule – When would you like the query to run and fill the queue
3. Click the Save
 icon to complete

Once the queues have been edited to your business needs, follow the steps below to add users to the queues.
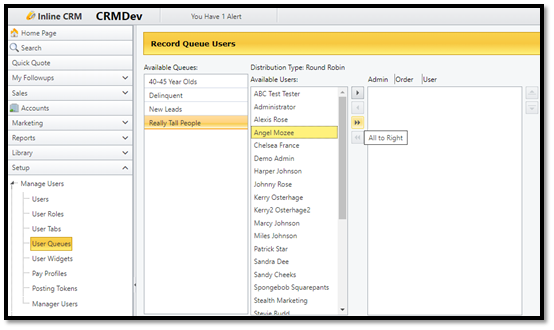
1. Go to Setup > Manage Users > User Queues
2. Select the Queue > Select the available user(s) > Move the arrows into the last column to add
the user to the queue (You can select multiple users by holding control and clicking on desired
users, then clicking the single right facing arrow)
a. Changes are automatically saved, but logging out of the system is required to reflect the update
After you have added the users to the queue, you will have options to manage the lead distribution. Administrator access will allow the User to reassign leads to a different User and view all leads in the queue, however you cannot assign leads to a User with Admin access. To assign Administrator access, just check the box for ‘Admin’ next to the User’s name.
You can also “Order” the user priority level by;
1. Click on the user-name (Check admin box if needed)
2. To change the lead distribution order, select the user’s name and click the up or down arrows to
the right until you reach the order you would like. (Changes are automatically saved, but signing out of the
system is required to reflect the update)

Adding Records to a Queue if accidentally removed
1. Click on the queue to open > Right click anywhere on the queue > Click Queue History

2. Click the Filters Tab > Click the pop up calendar and select a Start Date > Click Apply Filter- This will load all
records that have been added to this queue within the date range you entered

3. Right Click on any record in the queue. You then have 3 options;
A. ReAdd To Queue- With Previous User- Assign to the user it was originally assigned to. (You can reassign each individual record or hold the Control key + Click to select and reassign multiple records)
B. ReAdd To Queue- Without User (would not assign to any user) (You can reassign each individual record or hold the Control key + Click to select and reassign multiple records)
C. Export Grid Data- This would allow you to export the entire queue to a CSV and sort the data however you'd like. I'd recommend doing this and opening a new web tab so you can view the Queue and exported CSV side by side. The CSV will allow you to sort by Entry Removal Time and see the Date & Time when records were removed
4. Once you've reviewed the CSV and know which records were removed in error, you can reassign them to the
queue by right-clicking each record individually or hold the Control key + Click to select multiple records.

Was this article helpful?
That’s Great!
Thank you for your feedback
Sorry! We couldn't be helpful
Thank you for your feedback
Feedback sent
We appreciate your effort and will try to fix the article